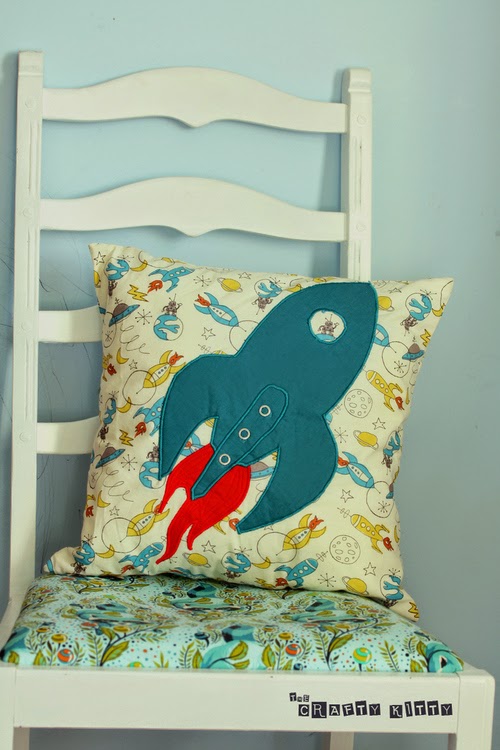
Tutorial & Free PDF Template | Rocket Cushion | by The Crafty Kitty
View more tutorials on Fabricworm.com
Welcome back Stephanie, of The Crafty Kitty, with a simple and adorable way to add a little "rocket power" to your children's bedroom, or reading nook! This tutorial includes a Free PDF template for the rocket applique, and Stephanie has great tips on how to get a professional look with your appliques. Find the Circa 52 fabric collection at Fabricworm here. Check it out!
The combination of the space print from the circa 52 range and the embroidered appliqué sewn from mod basics organic solids, will be an 'out of this world' addition to any space fanatic's bedroom!
Supplies
- 1/2 yard circa 52 Space
- fat quarter mod basics teal
- fat quarter mod basics tomato
- fat quarter wadding/batting
- double sided interfacing
- 3 small snaps
- rocket and flame pdf pattern
Preparation
- Cut out one, 16" square from Circa 52 Space
- Cut out one 16" by 12" rectangle from Circa 52 Space
- Cut out one 16" x 6" rectangle from Circa 52 Space
Instructions
Sewing the back of the cushion
Step 1
Fold the raw edges of the envelope back under by 1/4" press, fold under another 1/4", press and top stitch.
Step 2
Overlap the edges by 1.5" and baste the side edges in place
Creating the applique
Step 1
Trace rocket and flame onto the backing paper for double sided interfacing and iron the rocket shape onto the teal fabric and the flame onto the tomato fabric. Cut out.
Step 2
Trace smaller set of rocket and flame onto the backing paper for double sided interfacing and iron onto back of wadding. Cut out.
Step 3
Remove backing paper from the interfacing attached to the flame and iron onto the wadding, with the wadding centred. Remove backing paper from wadding and iron flame into position on cushion front.
Step 4
Use satin stitch to outline flame and freehand quilt to add detail.
Step 5
Remove backing paper from the interfacing attached to the rocket and iron onto the wadding, with the wadding centred. Remove backing paper from wadding and iron rocket into position on cushion front.
Step 6
Use satin stitch to outline rocket and add the detail. Add backs of snaps to rocket as marked on pattern by small grey circles.
Optional: embroider over some of the star shapes for extra detail!!
Finishing the cushion
Step 1
Place the front and back, right sides facing and sew all around the perimeter. I like to overlock the seam to give a neat finish to the inside of the cushion.
Step 2
Turn cushion right side out and press.
>>>>>>>>>>>>>>>>>>>>>>>>>>>>>>>>>>>>>>>>>>>>>
Thanks for the beautiful tutorial Stephanie! WE love this rocket pillow and can't wait to make one for ourselves!
Welcome back Stephanie, of The Crafty Kitty, with a simple and adorable way to add a little "rocket power" to your children's bedroom, or reading nook! This tutorial includes a Free PDF template for the rocket applique, and Stephanie has great tips on how to get a professional look with your appliques. Find the Circa 52 fabric collection at Fabricworm here. Check it out!
The combination of the space print from the circa 52 range and the embroidered appliqué sewn from mod basics organic solids, will be an 'out of this world' addition to any space fanatic's bedroom!
Supplies
- 1/2 yard circa 52 Space
- fat quarter mod basics teal
- fat quarter mod basics tomato
- fat quarter wadding/batting
- double sided interfacing
- 3 small snaps
- rocket and flame pdf pattern
- Cut out one, 16" square from Circa 52 Space
- Cut out one 16" by 12" rectangle from Circa 52 Space
- Cut out one 16" x 6" rectangle from Circa 52 Space
Instructions
Sewing the back of the cushion
Step 1
Fold the raw edges of the envelope back under by 1/4" press, fold under another 1/4", press and top stitch.
Step 2
Overlap the edges by 1.5" and baste the side edges in place
Creating the applique
Step 1
Trace rocket and flame onto the backing paper for double sided interfacing and iron the rocket shape onto the teal fabric and the flame onto the tomato fabric. Cut out.
Step 2
Trace smaller set of rocket and flame onto the backing paper for double sided interfacing and iron onto back of wadding. Cut out.
Remove backing paper from the interfacing attached to the flame and iron onto the wadding, with the wadding centred. Remove backing paper from wadding and iron flame into position on cushion front.
Step 4
Use satin stitch to outline flame and freehand quilt to add detail.
Step 5
Remove backing paper from the interfacing attached to the rocket and iron onto the wadding, with the wadding centred. Remove backing paper from wadding and iron rocket into position on cushion front.
Step 6
Use satin stitch to outline rocket and add the detail. Add backs of snaps to rocket as marked on pattern by small grey circles.
Optional: embroider over some of the star shapes for extra detail!!
Finishing the cushion
Step 1
Place the front and back, right sides facing and sew all around the perimeter. I like to overlock the seam to give a neat finish to the inside of the cushion.
Turn cushion right side out and press.
>>>>>>>>>>>>>>>>>>>>>>>>>>>>>>>>>>>>>>>>>>>>>
Thanks for the beautiful tutorial Stephanie! WE love this rocket pillow and can't wait to make one for ourselves!


Comments
https://vidmateapp.pro/
vidmate
vidmate
Mutual Fund Distributor
jobs in pakistan
jobs in uae for pakistanis
jobs in dubai for pakistanis
CSP apply
CSP online application
apply for CSP
Apply Online For Bank CSP
http://bettertransport.org.nz/forum/memberlist.php?mode=viewprofile&u=3387
http://www.pajarosilvestre.es/member.php?action=profile&uid=2458
http://www.cruzroja.es/creforumvolint_en/user/edit/67698.page
https://profile.10fastfingers.com/forum/memberlist.php?mode=viewprofile&u=14726
https://forums.factorio.com/ucp.php?i=ucp_profile&mode=profile_info
Regards,
GBWhatsApp (GBWA) is the best solution for you. It is a modded version .
then GBWhatsApp APK is available to download .