Patternless Messenger Bag Tutorial
View more tutorials on Fabricworm.com
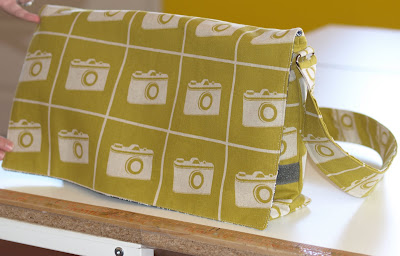 Just in time for school, here is a patternless messenger bag for you to make for your favorite scholar. I used Echino Spring 2010 Ni-co Camera Gold since it is cool, hip and can work for the fellas or the ladies. I lined it with Jennifer Moore/Monaluna Mingle Steel for a more masculine look. The gold and steel combination look fantastic together.

 |
| Echino Cameras Gold @ fabricworm.com |
 |
| Monaluna Squares Steel @ fabricworm.com |
Here is what you will need:
1 yard of Echino Ni-co Camera Gold or other heavy weight fabric for exterior
1 yard of Jennifer Moore/Monaluna Mingle Steel or other light weight cotton for lining
1 yard of heavy weight fusible interfacing
1 yard of light weight fusible interfacing
Coordinating thread
2/3 yard of velcro
2 rings for the strap - see Step 8 for an example
Heavy duty or denim needle
1. Cut one piece of the exterior fabric and one piece of the lining 20" wide and 36" long.
2. Apply the heavy weight fusible interfacing to the exterior fabric according the manufacturer's instructions. Do the same with the light weight interfacing and the lining. Have the pieces of interfacing be slightly larger than the exterior and lining pieces. Be patient with your iron and take your time to really fuse the interfacing to the fabric. Trim the excess interfacing when you are finished.
3. To make the body of the bag, fold one end of the bag over 12 1/2". Finger press the seam flat.
 4. To create the flat bottom of the bag, make the following marks:
a. Mark 1 1/2/" on the bottom.
b. Mark 2 1/2" on the side.
c. Mark 1 1/4" up from mark a.
Connect mark b to mark c as in the picture below.
 Cut out along the lines.
5. Sew the fuzzy side of the velcro across the front of the bag.
 6. Sew up the sides using a 1/2" seam allowance and then pin the bottom openings together and stitch closed.
 7. Turn the bag right-side out and admire your handiwork.
 8. Cut two pieces 2" wide and 4" long. Fold over sides and top stitch.
 9. Insert tab through the ring and stitch to the side of the bag one inch below the top of the bag. Be sure to reinforce these stitches because the tabs are going to get a lot of wear.
 10. To shape the front flap of the bag, mark one inch from the top. Using a ruler, draw a line from the mark to the seam at the body of the bag. Cut along this line. This will create a better shape for the front of the bag. If the flap hangs too long over the body of the bag, you can also trim the top a little. Just be sure to cut the same amount off the lining.
 11. Repeat the above steps for the lining by sewing up the side seams, creating the cut out for the flat bottom and sewing one of the bottom seams closed. Leave the other one open for later.
12. To create the interior pocket, cut a piece of the lining 7" x 14". Fold in half and sew along the sides and part of the bottom as in the picture below. Clip the corners, turn inside out and press.
 Center the pocket on the back side of the bag (or anywhere you want it), pin in place and sew along the sides and bottom. You will sew the opening closed when you sew the pocket to the bag. It is hard to tell because of the print, but the pocket is sewn in the lining in the picture below.
 13. Cut two pieces of the teeth side of the velcro and sew into the lining. By sewing the teeth side vertically and the fuzzy side horizontally, your bag will still close no matter how full it is.
 14. Place the exterior of the bag inside of the lining. Be sure that the lining is wrong-side out (so you can see the interfacing) and the exterior is right-side out. Pin in place. Sew across the front of the bag and along the flap with a 1/2" seam allowance using a heavy duty needle. There are a lot of layers at the seams. Go slowly around the side seams and maintain the 1/2" seam allowance.
 This is what the corners are going to look like when you are done sewing.
 14. Clip the corners as close to the seam as possible. This is going to reduce the bulk from so many layers of fabric.
 15. Clip the corners at the top of the bag too.
 16. Gently pull the exterior of the bag through the opening in the lining. Straighten the bag out, and press.
 17. Sew up the opening in the lining. Top stitch along the front of the bag and along the flap.
 18. To make the strap, measure how long you want the strap. The strap for this bag is 90 inches long. Cut the strap 2 1/2" wide. Fold in the sides and press. Then thread the strap through the rings and sew the ends together, creating a big loop. Pin the sides in place and top stitch them together along both sides and across the wide of the ring.
 Congratulations! You are all done.
Comments
Now to find some orcs, trolls, or dragon fabric to go with it. This is a great tutorial and it makes it look so simple.
Love the camera fabric, btw!
My children love these and I do too!
vandra